How to use gravatar API to render user public avatar
Gravatar API to fetch the user's public avatar and display it in your application.

Introduction 🎬
Many applications provide an option for users to upload a profile picture for their profile, but not all users opt for uploading a custom profile picture so in such cases, applications should have some mechanism to show a default picture based on name, email, and more user attributes.
Some applications just use the initials of first and last name to show the profile picture, but that is not all users want, they want to use their public avatar as their default picture.
Now the problem is how applications access the user's public avatar, well every problem has some solutions, and similarly, we have solutions for accessing the user's public avatar with the help of Gravatar.
Gravatar is a free avatar service that powers your public profile, visible wherever you post, comment, and interact online. big companies like GitHub, Slack, and Wordpress.com uses Gravatar service to automatically render the user's public avatar.
In this tutorial, we will be using Gravatar API to fetch the user's public avatar and display it in our applications.
Gravatar provides API support for many languages and frameworks.
For the course of this tutorial, we will be using JavaScript implementation and implementing API in React application. You can follow along with any type of JavaScript application.
Let's get started,
Setting up the application 🚀
Create React App
npx create-react-app gravatar-app
Install the Chakra UI dependencies
npm i @chakra-ui/react @emotion/react @emotion/styled framer-motion
#OR
yarn add @chakra-ui/react @emotion/react @emotion/styled framer-motion
Wrap Your app with ChakraProvider
import { StrictMode } from 'react';
import { createRoot } from 'react-dom/client';
import { ChakraProvider } from '@chakra-ui/react';

import App from './App';

const rootElement = document.getElementById('root');
const root = createRoot(rootElement);

root.render(
  <StrictMode>
    <ChakraProvider>
      <App />
    </ChakraProvider>
  </StrictMode>
);
Implementing the Gravatar API 👨🏻💻
In this section, we will be creating a simple user dashboard and then implementing the Gravatar API to get a user public profile based on provided email address.
Create a simple user dashboard
import React from 'react';
import { Box, Grid, Avatar, Input, GridItem } from '@chakra-ui/react';
import { getUserAvatarURL } from './utils';

const USER_DATA = {
  firstName: 'Sachin',
  lastName: 'Chaurasiya',
  email: 'sachinchaurasiya87@gmail.com'
};

export const Dashboard = () => {
  return (
    <Box as="div">
      <Grid
        gap={4}
        templateColumns={{ base: 'repeat(1, 1fr)', lg: 'repeat(3, 1fr)' }}
      >
        <GridItem colSpan={{ base: 1, lg: 1 }}>
          <Avatar
            display="block"
            margin="auto"
            alignSelf="center"
            name={`${USER_DATA.firstName} ${USER_DATA.lastName}`}
            size="2xl"
            src={getUserAvatarURL(USER_DATA.email, 2048)}
          />
        </GridItem>
        <Box>
          <Input mb={2} defaultValue={USER_DATA.firstName} />
          <Input mb={2} defaultValue={USER_DATA.lastName} />
          <Input type="email" defaultValue={USER_DATA.email} />
        </Box>
      </Grid>
    </Box>
  );
};
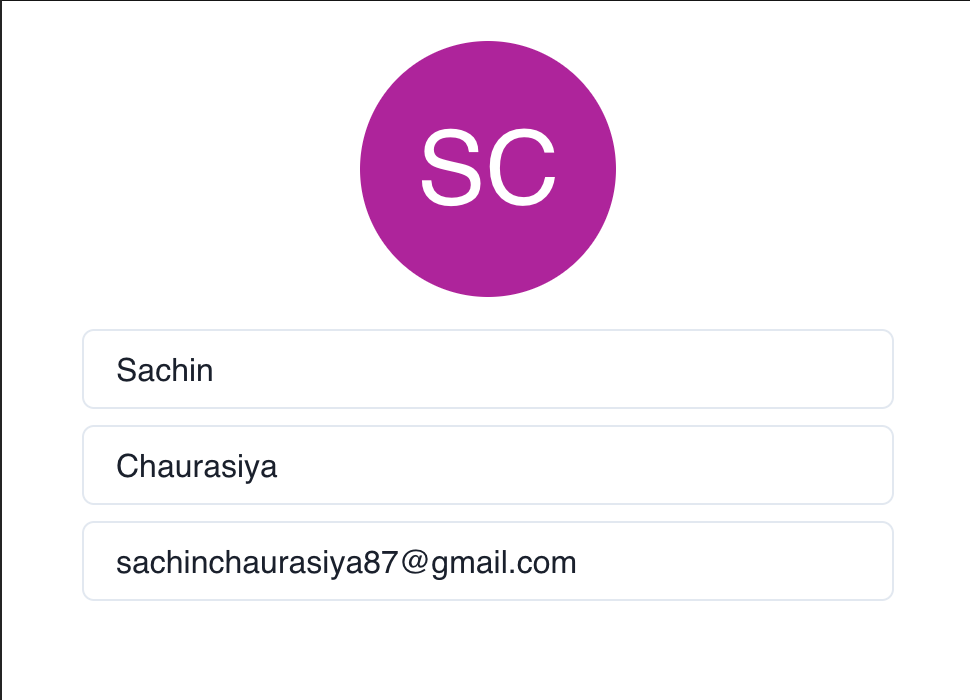
Here we have created a simple user dashboard with firstName, lastName, email, and avatar. if you notice the avatar is currently using the name prop to render the user avatar, let's change that and use Gravatar API to create the avatar source link for the user.
Install md5 for creating the email hash
npm install -D md5
#OR
yarn add -D md5
Create a util function to get the avatar URL
# utils.js

import md5 from 'md5';

export const getUserAvatarURL = (email) => {
  if (!email) return '';

  const emailHash = md5(email);

  return `https://www.gravatar.com/avatar/${emailHash}`;
};
Here, we are creating a getUserAvatarURL util method to get the user avatar link by their email address, we are checking if the email is falsy value then we will return the empty string else we will create the email hash using the md5 function and then return the avatar link like https://www.gravatar.com/avatar/${emailHash}.
Now update the Avatar component and provide the src prop value like this:
import { getUserAvatarURL } from './utils';
...
       <Avatar
            ...
            src={getUserAvatarURL(USER_DATA.email)}
         />
...
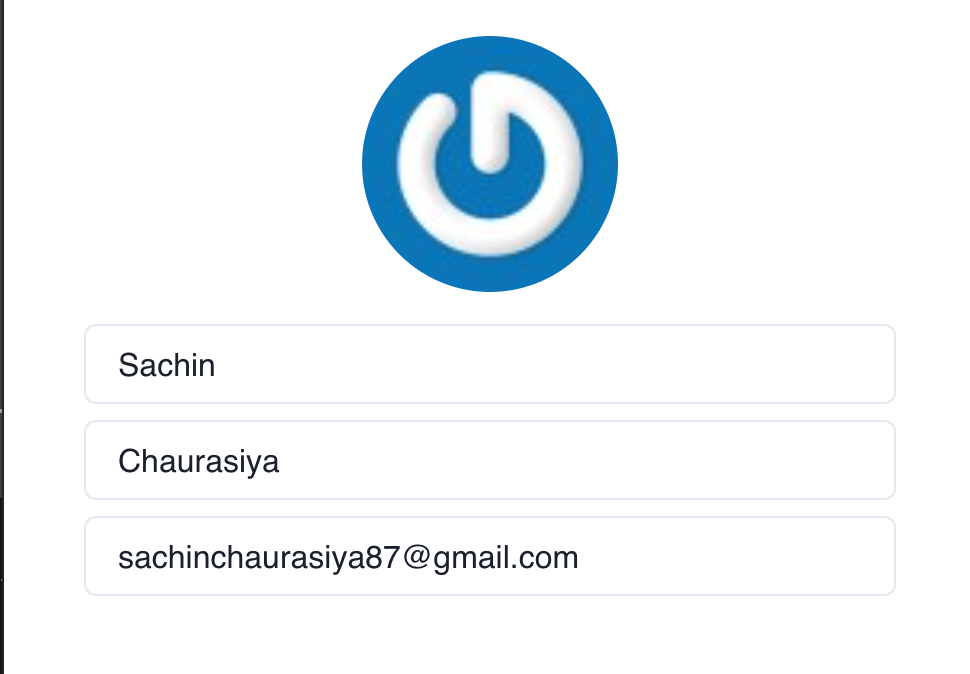
Now, if you see a user's public avatar being shown with the help of Gravatar API.
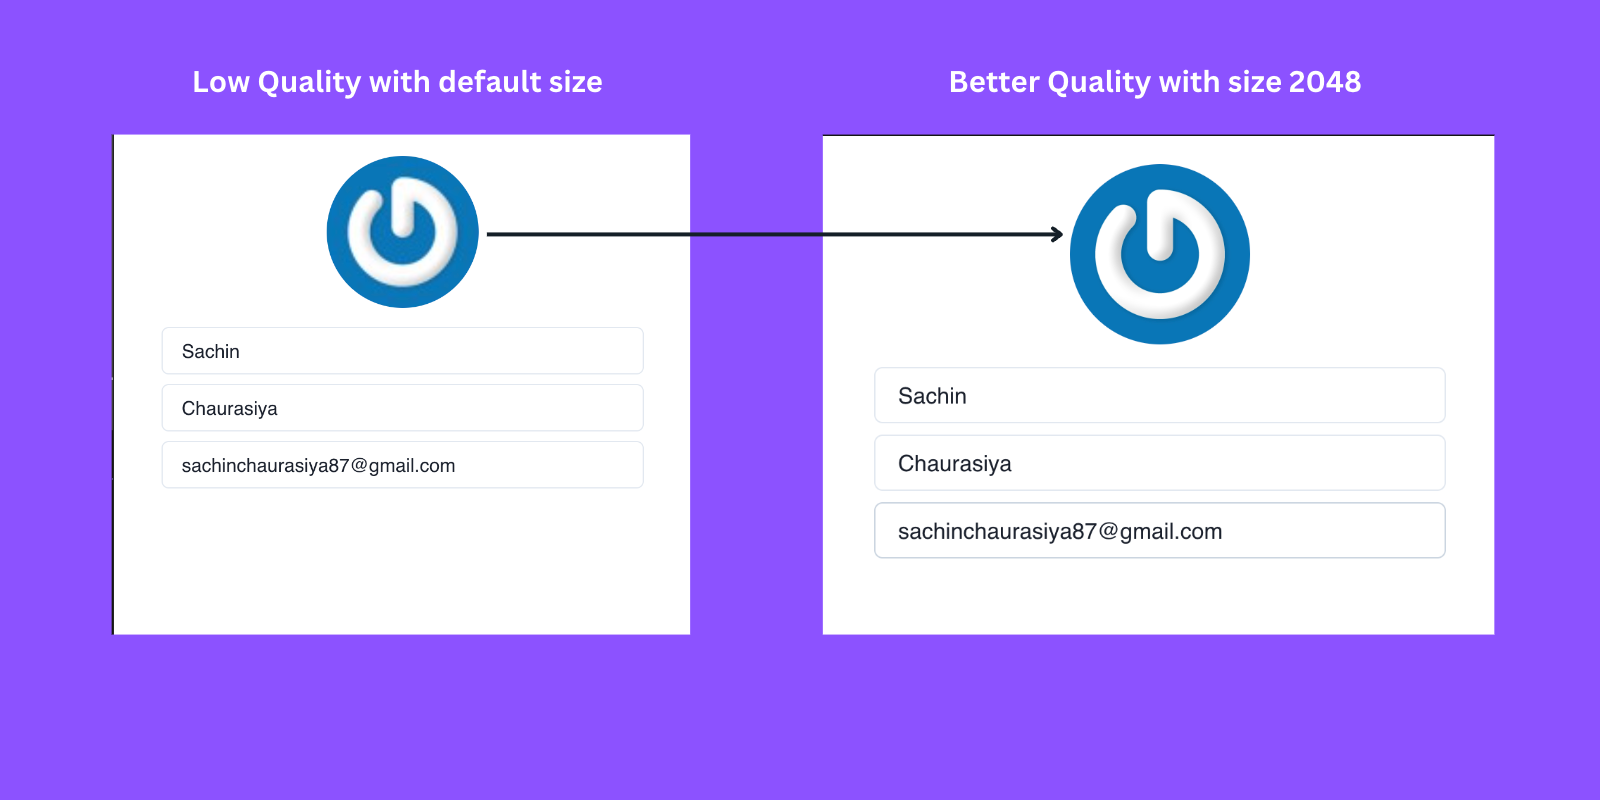
Gravatar also provides an option to specify the size of the avatar using the query param s or size. By default, images are presented at 80px by 80px if no size parameter is supplied.
sorsizeshould be between 1px to 2028px
# utils.js

...

export const getUserAvatarURL = (email,size) => {
 ...
  return `https://www.gravatar.com/avatar/${emailHash}${size?`?size=${size}`:''}`;
};
If you provide a size as high it will return the best quality avatar image.
import { getUserAvatarURL } from './utils';
...
       <Avatar
            ...
            src={getUserAvatarURL(USER_DATA.email,2048)}
         />
...
If you notice With the size 2048 the avatar quality is much better.
There are another bunch of options Gravatar API provides but covering all of those will not be in the scope of this tutorial, I will provide further learning links in the Resource section.
And that’s it for this topic Thank you for reading.
If you found this article useful, please consider liking and sharing it with others. If you have any questions, feel free to comment, and I will do my best to respond.